.gif)
By: Heather Gazdik, RD
Heather Gazdik, RD is a programmer/analyst for Lippincott
Williams & Wilkins(LWW). She graduated from Buffalo
State College with a degree in Dietetics. She worked
in various healthcare settings before deciding to
go
back to school for software development. At the end
of her transition from dietitian to programmer in
1999, she began keeping track of patient data and
enteral tube feeding regimines on a Compaq Aero 2100.
She retains he RD status and has since upgraded her
device.
|
|
The Palm OS emulator can be an invaluable tool used while developing
applications or for demonstrating applications on a laptop/desktop
computer to large groups of people. A Proxima projector can
be connected to a laptop and used to display on a projector
screen. In this article, I will describe the steps needed from
installation to utilization of the program. There are Mac OS
versions of the files, but I do not own a Mac. I will be using
only the Windows version of the files. These files are NOT to
be used with actual devices.
I will ask you to download the emulator files and ROM images
from the Palm OS site. You will need an unzip program like WinZip.
You can think of the emulator files as the "hardware"
and the ROM images as the "software" or "operating
system" of the emulator. Since most programs support or
will need to support the Palm 4.0 OS (and greater), we will
use the ROM images for the Palm OS 4.1. This is the Palm OS
version being shipped in devices at this point and time. Palm
has available the emulator files and ROM images for the Palm
OS 5.0 version. I will not cover this version, but feel free
to download these files if you wish to work with the latest
Palm OS version. Which set of files you download is not dependent
on the type of device you are currently using, I repeat, you
will not be using any of these files with your actual device.
Palm requires that you join the Palm OS developers program to
gain access to ROM image files. You do not need to belong to
download the emulator, but you need the ROM images for the emulator
to be of any use.
1) Go to www.palmos.com;
click on "Developer Programs" and choose the Palm
OS developer program option. You will now need to click on
"Join." I signed up over two and half years ago,
so I am not sure what the registration process is like now.
I have basic level support.
2) Once you have successfully joined, log in, then this should
take you to the Resource Pavilion.
3) We will download the ROM images first. Click Palm
OS Development Seeding Area.
4) Scroll down until you see EMULATOR ROM's.
5) Click Web
Clipping ROM Image Files and agree to the license agreement.
6) We are using the Web Clipping ROM image files because
these are the images for the Palm OS 4.1 version. You will
see that there are several files to choose from. We are going
to focus on the English version of these files. This narrows
our choice down to two: Debug and Release. If you are developing
actual programs, Palm encourages developers to use Debug ROM
images so you can find errors in the programs. If you are
just using for display/demo purposes, you can use the release
ROM images. I will show you that these images are easy to
interchange when using the emulator, so if you wish, you can
download both versions. Save these zip files somewhere on
your computer. I created a folder named "Emulator41."
For the Palm OS 4.1 download:
· All English Platform ROMs (release) 4.8MB zip
· All English Platform ROMs (debug) 4.9MB zip
7) We will now download the emulator files. At the top of
the page that we are on, click the link to Palm OS Emulator.
Scroll down to where it says "Download the Emulator."
Choose the Windows option for the Emulator application 3.5.
The zip file is 2.84MB in size. It is OK that we are downloading
the 4.1 version of the ROM image and the 3.5 version of the
Emulator.
8) We will now download the Skins. The Skins are optional
files that you can use to make the "outside" of
the emulator look like an actual device. I will give more
detail later. Choose the Windows option for Emulator Skins*
1.8 (1.9MB in size).
9) There is one more thing we want to download for those
of you who wish to replicate the use of the storage cards
that come with some of the newer devices. We will need the
HostFS Tool. HostFS is an implementation of a file system
on Palm OS that works in conjunction with the Emulator's "Host
Control API" to mount a local directory on the desktop
as a volume/card in Palm OS. This is an optional download
and is not needed to run the emulator; however, if you wish
to display or develop with several programs this file is needed.
Otherwise, you will have 8MB or 16MB of memory to use with
the emulator. HostFS can be found if you scroll down to the
bottom of the Emulator page (we are now on it). Download the
Windows version. The size of the file is 5KB.
You should now have these files saved on your
computer:
· Emulator-win.zip
· Emulator-skins-18.zip
· enUS_release_41roms.zip
· enUS_dbg_41roms.zip
· HostFS_emulator.zip
10) Unzip all of the files. I would unzip them
to the same folder you created to save the zip files. I used
"Emulator41."
Now you can complete the installation of the emulator program
onto the computer.
11) Open the folder where you unzipped all of the files.
Double click on the emulator.exe. You may see a dialog box
that states that you need Skins. Just click OK.
A small dialog box will pop up asking if you want to "add
the emulator to your start menu." Click "OK."
What this will do is add the emulator to the Start menu, so
when you click Start it will show up as a menu item. This
is an easy way to restart the emulator for future use. You
will then see another dialog box for a new session.
Click "New." In the drop down box for ROM file, click
the down arrow and chose "Other." This will allow
you to browse on your computer to where you saved the ROM images.
I have mine in the Emulator41 folder. There are several ROM
images to choose from. I have chosen the Release ROM image of
the Palm m505 (platform41_m505_en.rom).
This automatically changes the Device drop-down box to display
Palm m505.
The Skin drop-down box comes with a default of Generic. If
you want to change the Skin (or what the outside of the emulator
looks like) to look more like the actual device, you need to
rename the Skins_v1.8 folder to Skins. Emulator looks for the
Skins directory in the same directory as the Emulator executable
file. Renaming the folder to Skins will enable a new item in
the drop-down box of Skin: Standard-English. This chooses the
appropriate Skin for the device.
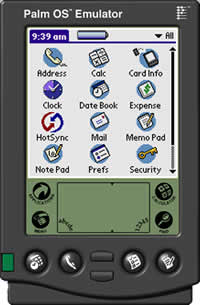
If we had chosen the Generic option, the emulator would look
like this:
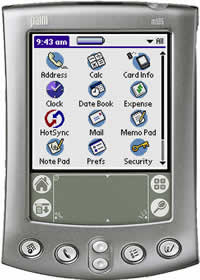
But when we choose the Standard-English version which looks
like this:
Congratulations! You now have a working emulator. You can use
your mouse to tap on the screen just as you would do with a
stylus and a device.
Now we want to install some application files. Open a folder
where you have one of your medical applications stored. I have
opened a folder where I have files for The Lippincott Manual
of Nursing Practice. We have pulled all of the procedures from
the print version. There are two ways to transfer files onto
the emulator:
1) Drag the files onto the emulator. An easy way to do this
is to hold down the ctrl key while you highlight the files
with your mouse, then simply drag the highlighted files onto
the emulator. You will see a dialog box stating that the files
are installing.
2) The other way is to right click on the outside of the emulator.
Menu items will display. Choose the "Install Applications/Database
option," then choose "Other" to browse to where
your medical applications are saved on your computer.
As you can now see, once the files have installed, the program
icon (AvantGo) appears on the home application screen.

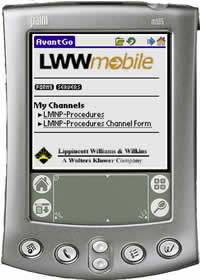
And when we tap on the AvantGo icon it takes us to the LWWMobile
home page where the LMNP Procedures is listed:
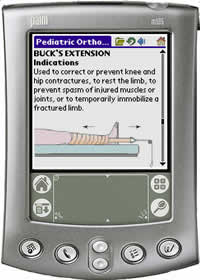
Any applications you want to move over onto the emulator should
work exactly like they do on the device. The picture below displays
information on Buck's Extension in the LMNP-Procedure application.
I want to now show you how to save an emulator session, how
to save as an executable file, and how to exit a session.
There are various reasons for why you may want to save an emulator
session; the main reason being that you do not want to have
to go through the trouble of starting a new session and transferring
files.
1) You will need to right click on the outside
of the emulator.
2) Choose the menu option "Save".
3) A dialog box will pop -up, prompting you to name and indicate
where to save the file
I named mine LMNP.psf and I saved it in the Emulator41 folder.
When you next start the Emulator program it will default to
the last known session that you were working in, but if you
save your session you can open it back up at any time by right
clicking on the outside of the emulator file. Chose the "Open"
menu option and locate the specific .psf file that you wish
to open.
I will now show you how to create an executable file that can
be very helpful, especially if you are giving a presentation.
Creating a Bound Emulator will create an executable file. This
exe file can be saved anywhere on the computer, for example,
on your desktop. When you are ready to start giving the presentation,
all you have to do is double click on the exe and it will immediately
open the session that you saved.
Please note: You must
be running Windows NT or Windows 2000 to create a bound emulation
session. You cannot create a bound emulation session on Macintosh
or on Windows 95, 98 or Me.
1) Right click on the outside of the emulator.
2) Choose the "Save as Bound Emulator" option.
3) Click the radio box as above and then click "OK."
4) You will be prompted to name and save the file. You, of
course, would want to rename the file to something specific,
but we cannot do this yet. Save the file just as it is named:
Emulator_bound.exe.
5) Go into the folder where you saved Emulator_bound.exe.
I saved mine in my Emulator41 folder. Right click on the file
Emulator_bound.exe; choose the "Rename" option.
Now you can name the file anything you want. I named mine
LMNP_Demo.exe.
6) You can now move this file anywhere you want (for example,
to the desktop), or you can burn it onto a CD if you need
to display on another computer.
To exit is easy. Just right click on the outside of the emulator
and chose the "Exit" option.